Recipe: Sesame Crisp Cracker Biscuit

Sesame Crisp Cracker Biscuit

Prep Time20 minutes
Cook Time15 minutes
Resting Time2 hours
Total Time2 hours 35 minutes
Course: Side Dish
Servings: 12

Ingredients

  • 1 1/2 cups grist mill flour
  • 1 cup whole wheat flour
  • 1/2 tsp salt
  • 1 cup warm water
  • 1 egg beaten
  • 1/2 tsp garlic powder
  • 1 tsp grated parmesan cheese
  • 1/2 tsp pepper

Instructions

  • Preheat oven to 425°F. Use ungreased baking sheet.
  • Combine flour, salt, garlic powder, pepper, and cheese.
  • Add water to mix. Stir until forms soft dough.
  • Turn dough onto floured surface and knead about 10 minutes.
  • Place in greased bowl. Cover with damp cloth and rest at room temperature for 2 hours.
  • Divide dough into four portions. Roll each piece into very thin rounds 12 inches in diameter.
  • Transfer to baking sheet and brush lightly with beaten egg. Sprinkle sesame seeds on dough.
  • Bake 10 to 15 minutes until crisp.

Notes

This recipe comes from a fantastic cookbook prepared by the Friends of the Grist Mill in 2003 based on some of the most popular recipes in the Tea Room.

Recipe: Quick Cheese

Quick Cheese

A quick and easy first cheese recipe.
Total Time2 hours
Author: Chris Mathieson

Materials

  • 1 gallon milk use whatever kind of milk you'd like
  • 1/2 cup white vinegar
  • 1 tbsp salt optional

Instructions

  • Warm the milk in a large heavy-bottomed pot, stirring continuously until it reaches 195F and then remove from heat. (We don't want any of the milk to scorch to the bottom, so be diligent about the stirring.)
  • Pour in the vinegar and stir gently once or twice to ensure the acid is evenly mixed, but don't over stir and risk damaging the curds.
  • Watch as the white curds start to develop and separate from the yellow whey. As they cool, the curds will get firmer, and stick to each other. This should take about five minutes.
  • Carefully ladle the warm curds into a strainer lined with multiple layers of cheesecloth–resist the temptation to pour them from the pot into the strainer–it'll only damage the curds and those little pieces will clog the cheesecloth. Capture the whey in a bowl placed under the strainer. Once cool, you can drink it (it's delicious!), use it as extra flavour in soup stock or use it as plant food in your garden.
  • Add salt at this point, if desired. You can also add other herbs or spices, if you'd like to experiment. If you add something, give it a gentle toss with a fork to spread your addition through the curds.)
  • For queso fresco,  gather the cheesecloth edges together and twist gently to give the cheese a little squeeze and let sit on a draining rack as the whey continues to drip out of the cheese. For paneer, take the cheese and place in a cheese mold with a weight on top to more firmly press the cheese. As soon as it's cold, it's ready to use!
  • This cheese, in either form, will last about a week in the fridge. Unlike other cheese, paneer and queso fresco can also be frozen without much effect. Also, because of its firm texture, paneer can be fried without melting.
  • Enjoy!

Notes

At its most basic, making cheese is simply the process of turning milk into something solid and tasty. There are many different ways to accomplish this, but they generally involve using some combination of acid, heat and enzymes. This simple and quick cheese recipe will use acid and heat to turn a gallon of store-bought milk into about a pound of something you could call “queso fresco” or “paneer”.
This isn’t a hard process, but you need to pay close attention to get the best results.

Recipe: Rhubarb Upside-Down Cake

Rhubarb is a vegetable that pretends to be a fruit, but we love it anyway. One of the very first harvests of spring, signaling the abundant garden bounty that will be coming soon. Older plants can often be very productive, so if you know someone with a well-established yard it’s entirely possible that they have more rhubarb than they know what to do with. It never hurts to ask.

This simple recipe is very straight forward, and the results are sure to impress anyone. Serve it with whipped cream, vanilla ice cream or a big glass of cold milk.

Rhubarb Upside-Down Cake

A quick seasonal cake that’s sure to impress.
Prep Time30 minutes
Cook Time35 minutes
Total Time1 hour
Course: Dessert
Servings: 8 pieces
Author: Chris Mathieson

Ingredients

In Skillet

  • 3 cups sliced rhubarb
  • 1 cup sugar
  • 2 tbsp all-purpose flour
  • 1/4 tsp ground nutmeg
  • 1/4 cup butter melted

Batter

  • 1/4 cup butter melted
  • 3/4 cup sugar
  • 1 large egg room temperature
  • 1-1/2 cups all-purpose flour
  • 2 tsp baking powder
  • 1/2 tsp ground nutmeg
  • 1/4 tsp salt
  • 2/3 cup 2% milk

Instructions

  • Place rhubarb in a greased 10-in. cast-iron or other heavy ovenproof skillet. Combine sugar, flour and nutmeg; sprinkle over rhubarb. Drizzle with butter and set aside
  • For batter, in a large bowl, beat the butter and sugar until blended. Beat in the egg. Combine the flour, baking powder, nutmeg and salt. Gradually add to egg mixture alternately with milk, beating well after each addition until completely combined.
  • Spread batter over the rhubarb mixture. Bake at 350° until a toothpick inserted in the center comes out clean, about 35 minutes. Loosen edges immediately and invert onto a serving dish. Serve warm. If desired, serve with vanilla ice cream, whipped cream or a big glass of milk.
  • Enjoy!

Caring for your Sourdough (Part Two)

Okay, fine… you’ve got this new sourdough culture that you feel responsible for, and want us to be more specific in how to tend for it on a regular basis. If you haven’t already, make sure you read Part One first–it’ll make everything make more sense.

How to care for your Culture

Assuming you got your culture from us, it should be teeming with life. You’ll need to find it a bigger home (a 1L–or larger–canning jar or some other clean, non-porous container). Scoop or pour it from the jar we gave you into its new home.

It’ll be ready for a meal, so give it 1 cup of flour and 1/2 cup of water and stir to combine. Ideally, the water should be room temperature bottled water or tap water that’s been let to sit in the air for an hour or two, to evaporate the chlorine before you add it (if you live in a place with chlorinated water). 24 hours later, pour out everything but about 1/2 cup of culture and add 1 cup of flour and 1/2 cup of water

Repeat this daily for the next couple of days and before long you’ll notice that a few hours after you add the flour and water, the culture will bubble and rise up in the container. Once you see that happen, you can start to use the culture (or more accurately, the discarded part) in your baking. The way to know for sure is to do the “float test”. To test the culture, place a teaspoon of it (just from the top, don’t stir it down) in a glass full of water, it should hopefully float. If it does, you can make bread. Right away!

It doesn’t need to be actively frothy to be useful, but you know it’s at the peak of its activity when it passes the float test.

If you get tired of trying to keep up with your culture, you can always slow it down by putting it in the fridge–once it’s cold, it only needs to be fed once a week, not once a day (or more).

Next, in Part Three of this sourdough primer, we’ll give you a recipe or two to start with.

Caring for your Sourdough (Part One)

Congratulations, you’re now the proud owner of a living sourdough culture. The truth is, taking care of it is more art than science, so we’re going to give you a lesson, not just a set of instructions…

Some Useful Background

A sourdough culture is made up of four things: flour, water, yeast and bacteria. 

The basic idea is that you have this jar of flour and water in which both yeast and a particular set of beneficial bacteria happily live in. Those guests gradually eat the flour and turn it into carbon dioxide, alcohol (often called “hooch”), a tangy acid (hence the name “sourdough”) and a bunch of other complex things. In other words, you’ve got an advanced microbiology experiment, right on your kitchen counter.

Left alone, your living culture will produce so much acid, alcohol and carbon dioxide that the whole process will grind to a halt and the culture will die. As the proud owner of a sourdough culture, your goal is to keep the thing alive and adequately happy until you’re ready to take advantage of it’s incredible transformative powers. By feeding your culture regularly and taking away some of it for baking, you can easily control the accumulation of these by-products.

There are also a few other variables you have in your control, for example, temperature. Your culture is most active at a temperature just above room temperature; as such, the warmer the room, the more often you’ll need to feed it. Putting your culture into the fridge is an effective way to slow it down, if you know you can’t tend it consistently, but don’t store your culture in an air-tight container for too long; it can suffocate on the carbon dioxide it’s creating.

How often and how much you feed your starter culture is a matter of personal preference, but be mindful that if you feed it big meals of flour and water regularly, you’re going to have a lot of very happy starter. The less often you feed it, the more time there is for acids and alcohols to build up, which add flavour but reduce the activity. In terms of overall amounts, we feed ours equal volumes of water and flour once a day–usually about a quarter cup of each, but go higher if we know we’re giving some to others, or we’re going to bake a bunch of bread.

Because different flours can weigh different amounts of the same volume, your culture may be more or less runny than ours. If you see a recipe that mentions “baker’s percentages” or “percent hydration”, the numbers are based off the weight of flour; a starter with 100% hydration has equal weights (not equal volumes) of water and flour. The starter culture we gave you sits at about 140% hydration, but with that much water the culture eats through its food pretty quickly… if you’re not planning on baking every second or third day like we do, we’d suggest reducing the amount of water you put in and go for a less wet culture.

How will you know if something’s not right with your culture? If your culture smells yeasty and a little like sourdough, and seems frothy and like it’s grown a little a few hours after feeding it, you’ve got a healthy culture. If it smells really sour, or like it’s just been on a Just-Hit-Legal-Drinking-Age-style bender, it likely needs to be fed; you need to use and/or dilute it with fresh flour and water right away. If you see mold on your starter, you can safely assume your culture is dead. Way to go, murderer! (The particular yeast and bacteria that co-exist in your healthy culture are remarkably good at keeping bad bacteria and molds from growing, so any sign of them means it’s time to dispose of your culture.)

If you leave your culture untended for a few days, a greyish liquid might form at the top of your culture. That’s just hooch (alcohol) and you can either pour it out or mix it in; the alcohol will cook out when you’re baking and help give your bread a more interesting flavour, but too much of it can kill your culture.

If you know that you won’t be able to give your culture any attention for awhile, you might want to consider long-term storage. One of the best ways to do this is to freeze it. First, take some of your culture and smear it on a piece of wax paper. Once it’s completely dry, crumble the culture into powder and put it into a freezer bag, remove the air and put it into the freezer. The yeast goes dormant when it’s dry; when you’re ready to starting playing again, add the powder to a mixture of flour and water and start feeding it regularly again. It might take a week or two for the culture to fully come back to life, but when it smells and acts right, you know it’s ready for use.

When you use it for your first loaf of bread, you’re only going to use a portion of your starter–the rest will stay behind and continue to grow, which is why a sourdough starter culture is sometimes called a “mother culture”.

Of course, no matter how carefully you try to limit the amount of flour/water you’re adding, it doesn’t take long for you to end up with more starter than you can handle. Some of it might have to go down the drain, but sourdough starter can be used in a wide variety of recipes besides bread. For example, we make a quick pizza dough with it all the time. You can also use it for pancakes, waffles, crackers, flatbreads and more. And, of course, you can always share it with friends.

In Part Two of this guide, we’ll give you some more specific instructions and in Part Three, we’ll give you a recipe or two to start with.

Recipe: Home Brewed Ginger Ale

Home Brewed Ginger Ale

A tongue-tingling summer treat!

Ingredients

  • 2 inch piece of fresh ginger root
  • 1 cup water plus more to fill your bottle
  • 9 tbsp sugar
  • 1/8 tsp salt
  • 5 tbsp lemon juice fresh squeezed is best, or try lime juice
  • 1/8 tsp sparkling wine yeast bakers yeast will work in a pinch

Instructions

  • Peel and grate the ginger; you should end up with about 2 tbsp worth
  • Bring water to a boil in a small saucepan and remove from heat. Add the sugar and salt and stir to dissolve. Add ginger and let stand until cool, then stir in lemon juice.
  • Pour the ginger water into a clear 2 liter pop bottle with a funnel and top off the bottle with water, leaving a little over an inch of headspace. Give it a taste and just sugar and lemon juice as you like.
  • Add the yeast to the bottle, screw on the cap and give it a shake to dissolve the yeast. Then, be patient and let it sit in a warm place out of direct sunlight until it’s well-carbonated. You can check the bottle for carbonation by giving it a gentle squeeze; when it feels solid, it’s fizzy! (The carbonation can take anywhere from 12 hours to two days… just be patient.)
  • Refrigerate once it’s carbonated; it’ll last up to two weeks in the fridge but we’re sure you’ll drink it before then. BE CAREFUL when opening it for the first time… unscrew it slowly over a sink to avoid bubble-ups.
  • When serving pour it through a small fine-mesh strainer to catch the ginger bits.
  • Enjoy!

Notes

Homemade ginger ale packs a punch, but it’s so tasty you’ll want to keep making more. This recipe makes enough to fill a 2 liter plastic pop bottle.
A common yeast found in many homebrew shops that works great for this.
This basic recipe can be adapted in many different ways: try adding a splash of cranberry juice, or some lemon zest. If you want to make it nearly sugar-free, just use one tbsp of sugar and replace the rest with the sweetener of your choice–but remember: some sugar is necessary for carbonation. Also, if you can’t get to a homebrew shop for proper yeast, you can find it in many places online, or you can use baker’s yeast to carbonate in a pinch–it might just end up with a slightly yeasty flavour, especially if you let it sit for too long.

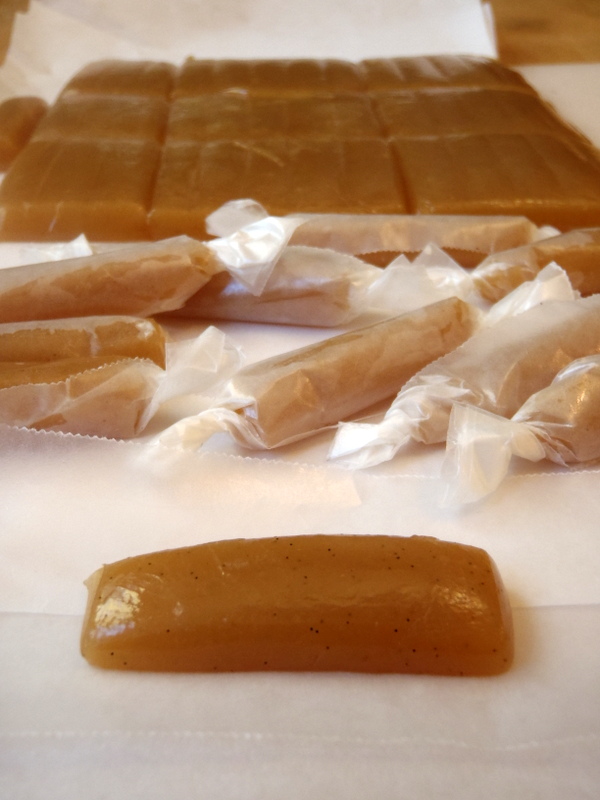
Recipe: Creamy Caramels

Creamy Caramels

A smooth and creamy caramel
Total Time1 hour

Ingredients

  • 2 cups light cream
  • 2 cups sugar
  • 1 cup corn syrup light or dark
  • 1/2 tsp salt
  • 1/3 cup butter
  • 1 tsp vanilla
  • optional: 1/2 cup chopped nuts

Instructions

  • Lightly butter an 8″ square pan.
  • Heat cream to luke-warm in a large heavy sauce pan. Once warm, pour out half the cream into another container and set aside.
  • Add sugar, corn syrup and salt to the cream in the saucepan. Cook over medium heat, stirring constantly, until mixture boils.
  • Slowly add the cream that you set aside into the sauce pan, so the mixture doesn’t stop boiling.
  • Cook for 5 minutes, stirring constantly. Add butter and lower temperature but keep it boiling gently and continue to stir.
  • When temperature teaches 248F, remove from heat. Mix in vanilla (and optionally nuts) and let stand for 10 minutes.
  • Pour into pan and let cool to room temperature; remove from pan onto a cutting board and cut into pieces with a sharp knife. Wrap each piece in wax paper.

Notes

Depending on the temperature you cook this to, the same recipe can be used for soft gooey caramel or a harder brittle caramel. Makes 2lbs of caramel.

Recipe: Basic Chocolate Fudge

Basic Chocolate Fudge

A great recipe to play with.
Total Time1 hour

Ingredients

  • 4 oz unsweetened chocolate
  • 1 1/2 cups milk
  • 4 cups sugar
  • 1/8 tsp salt
  • 1/4 cup butter
  • 2 tsp vanilla

Instructions

  • Butter an 8″ square pan
  • Put chocolate and milk in a heavy saucepan; heat and stir over low heat until mixture is smooth and well-blended.
  • Add sugar and salt and stir over medium heat until sugar is dissolved and mixture starts to boil.
  • Continut boiling over medium heat, without stirring to the “soft ball” stage (234F on a candy thermometer).
  • Remove from heat and add butter and vanilla.
  • Let cool to lukewarm (110F) then beat the mixture until it loses its gloss and holds it’s shape. Pour into pan and cool until set, then cut into squares.
  • Enjoy!

Notes

Once you’ve mastered the technique of basic fudge, you can add all sorts of flavourings, nuts and more. Makes about 36 pieces.

Recipe: Uncooked Fondant

Uncooked Fondant

A very pretty and adaptable candy
Total Time10 minutes

Ingredients

  • 1/3 cup butter
  • 1/3 cup light corn syrup
  • 1 tsp vanilla or a couple drops of your favourite flavour extract and/or food colouring
  • 1/2 tsp salt
  • 1 lb 454g icing sugar

Instructions

  • Combine butter, corn syrup, salt  and any flavourings and colourings in a bowl and mix.
  • Add in icing sugar and mix, first with a spoon and then kneading by hand until it it’s well-blended and smooth.
  • Shape as desired and store in an air-tight container.
  • Enjoy!

Notes

This easy uncooked fondant can be used to make mints, pretty decorations, fillings for dipping chocolates and more. This recipe makes 1.5lbs of candy.

Recipe: Barley Sugar

Barley Sugar

A classic simple hard candy.
Total Time30 minutes

Ingredients

  • 3 cups white sugar
  • 2 cups water
  • 1 tsp cream of tartar
  • a couple drops of your favourite flavour extract or 1 tbsp of lemon juice.

Instructions

  • Heat all ingredients until they reaches 310F on a candy thermometer and then remove from heat.
  • Pour into a buttered baking sheet and cool until it can be handled, then cut into shapes or roll pieces into sticks. (Or, if you have access to metal candy molds, you can use then instead.)
  • Store in an air-tight container.
  • Enjoy!

Notes

Traditionally, this candy was made by boiling barley in water and straining, then adding the sugar. Any real (not artificial) flavour extract can be used instead.