Caring for your Sourdough (Part Two)

Okay, fine… you’ve got this new sourdough culture that you feel responsible for, and want us to be more specific in how to tend for it on a regular basis. If you haven’t already, make sure you read Part One first–it’ll make everything make more sense.

How to care for your Culture

Assuming you got your culture from us, it should be teeming with life. You’ll need to find it a bigger home (a 1L–or larger–canning jar or some other clean, non-porous container). Scoop or pour it from the jar we gave you into its new home.

It’ll be ready for a meal, so give it 1 cup of flour and 1/2 cup of water and stir to combine. Ideally, the water should be room temperature bottled water or tap water that’s been let to sit in the air for an hour or two, to evaporate the chlorine before you add it (if you live in a place with chlorinated water). 24 hours later, pour out everything but about 1/2 cup of culture and add 1 cup of flour and 1/2 cup of water

Repeat this daily for the next couple of days and before long you’ll notice that a few hours after you add the flour and water, the culture will bubble and rise up in the container. Once you see that happen, you can start to use the culture (or more accurately, the discarded part) in your baking. The way to know for sure is to do the “float test”. To test the culture, place a teaspoon of it (just from the top, don’t stir it down) in a glass full of water, it should hopefully float. If it does, you can make bread. Right away!

It doesn’t need to be actively frothy to be useful, but you know it’s at the peak of its activity when it passes the float test.

If you get tired of trying to keep up with your culture, you can always slow it down by putting it in the fridge–once it’s cold, it only needs to be fed once a week, not once a day (or more).

Next, in Part Three of this sourdough primer, we’ll give you a recipe or two to start with.

Caring for your Sourdough (Part One)

Congratulations, you’re now the proud owner of a living sourdough culture. The truth is, taking care of it is more art than science, so we’re going to give you a lesson, not just a set of instructions…

Some Useful Background

A sourdough culture is made up of four things: flour, water, yeast and bacteria. 

The basic idea is that you have this jar of flour and water in which both yeast and a particular set of beneficial bacteria happily live in. Those guests gradually eat the flour and turn it into carbon dioxide, alcohol (often called “hooch”), a tangy acid (hence the name “sourdough”) and a bunch of other complex things. In other words, you’ve got an advanced microbiology experiment, right on your kitchen counter.

Left alone, your living culture will produce so much acid, alcohol and carbon dioxide that the whole process will grind to a halt and the culture will die. As the proud owner of a sourdough culture, your goal is to keep the thing alive and adequately happy until you’re ready to take advantage of it’s incredible transformative powers. By feeding your culture regularly and taking away some of it for baking, you can easily control the accumulation of these by-products.

There are also a few other variables you have in your control, for example, temperature. Your culture is most active at a temperature just above room temperature; as such, the warmer the room, the more often you’ll need to feed it. Putting your culture into the fridge is an effective way to slow it down, if you know you can’t tend it consistently, but don’t store your culture in an air-tight container for too long; it can suffocate on the carbon dioxide it’s creating.

How often and how much you feed your starter culture is a matter of personal preference, but be mindful that if you feed it big meals of flour and water regularly, you’re going to have a lot of very happy starter. The less often you feed it, the more time there is for acids and alcohols to build up, which add flavour but reduce the activity. In terms of overall amounts, we feed ours equal volumes of water and flour once a day–usually about a quarter cup of each, but go higher if we know we’re giving some to others, or we’re going to bake a bunch of bread.

Because different flours can weigh different amounts of the same volume, your culture may be more or less runny than ours. If you see a recipe that mentions “baker’s percentages” or “percent hydration”, the numbers are based off the weight of flour; a starter with 100% hydration has equal weights (not equal volumes) of water and flour. The starter culture we gave you sits at about 140% hydration, but with that much water the culture eats through its food pretty quickly… if you’re not planning on baking every second or third day like we do, we’d suggest reducing the amount of water you put in and go for a less wet culture.

How will you know if something’s not right with your culture? If your culture smells yeasty and a little like sourdough, and seems frothy and like it’s grown a little a few hours after feeding it, you’ve got a healthy culture. If it smells really sour, or like it’s just been on a Just-Hit-Legal-Drinking-Age-style bender, it likely needs to be fed; you need to use and/or dilute it with fresh flour and water right away. If you see mold on your starter, you can safely assume your culture is dead. Way to go, murderer! (The particular yeast and bacteria that co-exist in your healthy culture are remarkably good at keeping bad bacteria and molds from growing, so any sign of them means it’s time to dispose of your culture.)

If you leave your culture untended for a few days, a greyish liquid might form at the top of your culture. That’s just hooch (alcohol) and you can either pour it out or mix it in; the alcohol will cook out when you’re baking and help give your bread a more interesting flavour, but too much of it can kill your culture.

If you know that you won’t be able to give your culture any attention for awhile, you might want to consider long-term storage. One of the best ways to do this is to freeze it. First, take some of your culture and smear it on a piece of wax paper. Once it’s completely dry, crumble the culture into powder and put it into a freezer bag, remove the air and put it into the freezer. The yeast goes dormant when it’s dry; when you’re ready to starting playing again, add the powder to a mixture of flour and water and start feeding it regularly again. It might take a week or two for the culture to fully come back to life, but when it smells and acts right, you know it’s ready for use.

When you use it for your first loaf of bread, you’re only going to use a portion of your starter–the rest will stay behind and continue to grow, which is why a sourdough starter culture is sometimes called a “mother culture”.

Of course, no matter how carefully you try to limit the amount of flour/water you’re adding, it doesn’t take long for you to end up with more starter than you can handle. Some of it might have to go down the drain, but sourdough starter can be used in a wide variety of recipes besides bread. For example, we make a quick pizza dough with it all the time. You can also use it for pancakes, waffles, crackers, flatbreads and more. And, of course, you can always share it with friends.

In Part Two of this guide, we’ll give you some more specific instructions and in Part Three, we’ll give you a recipe or two to start with.

Recipe: Home Brewed Ginger Ale

Home Brewed Ginger Ale

A tongue-tingling summer treat!

Ingredients

  • 2 inch piece of fresh ginger root
  • 1 cup water plus more to fill your bottle
  • 9 tbsp sugar
  • 1/8 tsp salt
  • 5 tbsp lemon juice fresh squeezed is best, or try lime juice
  • 1/8 tsp sparkling wine yeast bakers yeast will work in a pinch

Instructions

  • Peel and grate the ginger; you should end up with about 2 tbsp worth
  • Bring water to a boil in a small saucepan and remove from heat. Add the sugar and salt and stir to dissolve. Add ginger and let stand until cool, then stir in lemon juice.
  • Pour the ginger water into a clear 2 liter pop bottle with a funnel and top off the bottle with water, leaving a little over an inch of headspace. Give it a taste and just sugar and lemon juice as you like.
  • Add the yeast to the bottle, screw on the cap and give it a shake to dissolve the yeast. Then, be patient and let it sit in a warm place out of direct sunlight until it’s well-carbonated. You can check the bottle for carbonation by giving it a gentle squeeze; when it feels solid, it’s fizzy! (The carbonation can take anywhere from 12 hours to two days… just be patient.)
  • Refrigerate once it’s carbonated; it’ll last up to two weeks in the fridge but we’re sure you’ll drink it before then. BE CAREFUL when opening it for the first time… unscrew it slowly over a sink to avoid bubble-ups.
  • When serving pour it through a small fine-mesh strainer to catch the ginger bits.
  • Enjoy!

Notes

Homemade ginger ale packs a punch, but it’s so tasty you’ll want to keep making more. This recipe makes enough to fill a 2 liter plastic pop bottle.
A common yeast found in many homebrew shops that works great for this.
This basic recipe can be adapted in many different ways: try adding a splash of cranberry juice, or some lemon zest. If you want to make it nearly sugar-free, just use one tbsp of sugar and replace the rest with the sweetener of your choice–but remember: some sugar is necessary for carbonation. Also, if you can’t get to a homebrew shop for proper yeast, you can find it in many places online, or you can use baker’s yeast to carbonate in a pinch–it might just end up with a slightly yeasty flavour, especially if you let it sit for too long.

COVID-19 Update – May 12, 2020

(There’s useful information in our first update from April. Check it out, too.)

Before any of this started, we’d planned to open on May 9th for the season–not only did that not happen, but we’re still not sure when we might be opening this year; there’s still too much unknown about the sorts of restrictions and adaptations that will be required by our Provincial Health Officer and WorkSafeBC. Fortunately, after 143 years, we know the spectacular heritage of this place isn’t going anywhere and we are finding ways to manage through this challenging time.

We’ve now cancelled all concerts, weddings, in-person workshops, dinners and more that we had planned for this summer. If you’ve already made a paid reservation or paid an event deposit, please get in touch so that we can sort out reimbursement.

These unique challenges have required us to be creative and so we’ve launched a new-and-improved Pantry Share program (with delivery to your door!), we’re offering daily “Virtual Field Trips” on Facebook Live and YouTube. Our Online Store is filled with all sorts of new products as well, and if you live in the Okanagan, Similkameen or Lower Mainland we can deliver them to your door!

One of the most straightforward ways you can help support us through these challenging times is to buy a Season Pass to the site right away. (And one for your friends, of course.) If we’re open for less than 75 days this year, your Season Pass will automatically be extended to the 2021 season. But in the meantime, that money will make a real difference for us.

As things change, we’ll be sharing more information regarding our plan for the season and how we hope to take care of ourselves, our site, our employees, our vendors and our community. You can always follow us on Facebook or subscribe to our newsletter to get the latest updates.

Ultimately, we’re all in this together, even if we’re apart.

We ❤️ you. (Go wash your hands.)

COVID-19 Update – Mar 20, 2020

The last few weeks have been an overwhelming torrent of news and information, and it’s quickly become clear that things won’t be returning to normal anytime soon. That’s a bitter pill for us, because up until now, we’ve been working incredibly hard to make this summer our best season yet–booking incredible music artists (including a Grammy winner!), planning workshops and presentations and much more. We’ve made improvements on site, installed new signage and many other things we’ve been looking forward to showing off… but now, it’s clear, we have to wait.

Effective immediately, we’re cancelling all events and bookings scheduled between now and May 9th, 2020. If you’ve already made a paid reservation or paid an event deposit, please get in touch so that we can sort out reimbursement. And going forward, we’re going to be changing our cancellation policy on reservations, bookings and event tickets–we won’t be able to provide refunds for sales after today, but will instead provide credit towards another reservation, booking or ticket.

As a business we’re in a holding pattern right now–we have staff scheduled to start in two weeks, suppliers we should be contacting to bring in product, summer students to start to recruit and train. All of that is currently on hold and we’re not sure we’ll be able to generate much revenue from our usual sources: admission fees, meals, campground reservations, etc. Meanwhile, we still have bills to pay, so need to generate some measure of income–that way we can keep working on getting the site ready for whenever we’re allowed to open.

One of the most straightforward ways you can help support is through these challenging times is to buy a Season Pass to the site right away. And one for your friends. If we’re open for less than 75 days this year, your Season Pass will automatically be extended to the 2021 season. But in the meantime, that money will make a real difference for us.

Over the next few days and weeks, we’ll be sharing more information regarding our plan for the season and how we hope to take care of ourselves, our site, our employees, our vendors and our community.

Ultimately, we’re all in this together and we’ll get through this.

We ❤️ you. (Go wash your hands.)

Call for Presenters – 2020 Speaker and Workshop Series

The Grist Mill and Gardens has now started planning our 2020 lecture and workshop series and we’re looking for speakers and hands-on presenters for a wide variety of topics.

We are a 12 acre BC heritage site in the heart of the Similkameen Valley featuring western Canada’s only working waterwheel-powered flour mill (built in 1877) and stunning ornamental, herb and vegetable gardens. History, agriculture and art combine in fascinating ways on our site and here are just some of the sorts of topics we’d love to see:

  • Food Preservation (canning, smoking, curing, drying)
  • Food Production (bread baking, cheesemaking, sprouting grains, microgreens)
  • Food Issues (food security, climate change, GMOs)
  • Local History (geneology, local characters, archeology, First Nations history)
  • Gardening (planning a garden, xeriscaping, composting, seed saving, companion planting, pruning, pest control)
  • Plant Identification and Uses (healing herbs, foraging, invasive species, natural dying with plants)
  • Wildlife (birds, bats, pollinators)
  • Visual Arts (painting, sketching, photography)
  • Fibre Arts (spinning, weaving, knitting, crochet, sewing, quilting, lace-making)
  • Rural Living Skills (wood stove cooking, raising chickens and other livestock, candle making, soap making)
  • Traditional Crafts (making paper, pressed flowers, wreath making, flower arrangement, quilling)

We generally offer two styles of presentation:

  1. Lectures – These are offered on weekend afternoons or weekday evenings and are usually no more than an hour long. Weekend lectures are offered at no additional cost to visitors and seasons pass holders. We generally offer an honourarium for these presentations.
  2. Hands-on Workshops – These are generally two or more hours long and run on weekday evenings or during half or full days on the weekend. They often have registration fees associated which are split with the presenter.

If you’re interested in presenting here in 2017 on these (or any other topic that seems relevant), please use the form below to tell us more about what you’d like to propose.

Please direct all questions to Chris Mathieson, Site Operator / General Manager at info@oldgristmill.ca and please share this with anyone else you think might be interested. Deadline to submit a proposal is March 9, 2020 and submissions will be considered in the order received.

[contact-form to=’info@oldgristmill.ca’ subject=’2017 Presenter Form’][contact-field label=’Name’ type=’name’ required=’1’/][contact-field label=’Email Address’ type=’email’ required=’1’/][contact-field label=’Phone Number’ type=’text’/][contact-field label=’Presentation Title’ type=’text’ required=’1’/][contact-field label=’Presentation Description’ type=’textarea’ required=’1’/][contact-field label=’What are the top three things attendees will take away from this session?’ type=’textarea’/][contact-field label=’This presentation would fit best under which category?’ type=’checkbox-multiple’ required=’1′ options=’Food Production,Food Preservation,Food Issues,Plant Identification and Uses,Local History,Gardening,Visual Arts,Fibre Arts,Natural History,Rural Living Skills,Traditional Crafts,Other’/][contact-field label=’How much time would you need?’ type=’select’ options=’1 Hour (or less),2 Hours,3 hours,Half-Day,Full-Day’/][contact-field label=’Preferred Audience(s)’ type=’checkbox-multiple’ options=’Youth (12 and under),Teens (13-18),Adults (19-59),Seniors (60+)’/][contact-field label=’About You (tell us a little about who you are what your interest and proficiency is in this topic)’ type=’textarea’ required=’1’/][contact-field label=’Anything Else We Should Know?’ type=’textarea’/][/contact-form]

Save

Save

Save

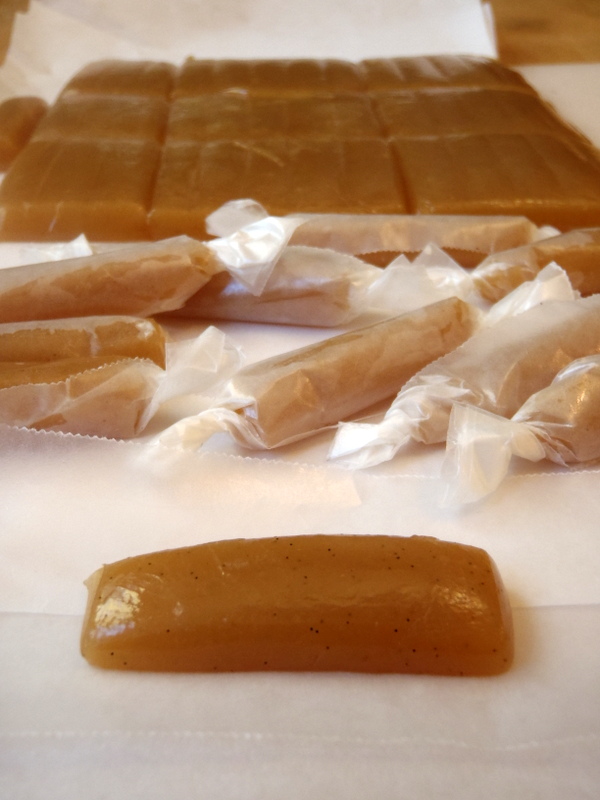
Recipe: Creamy Caramels

Creamy Caramels

A smooth and creamy caramel
Total Time1 hour

Ingredients

  • 2 cups light cream
  • 2 cups sugar
  • 1 cup corn syrup light or dark
  • 1/2 tsp salt
  • 1/3 cup butter
  • 1 tsp vanilla
  • optional: 1/2 cup chopped nuts

Instructions

  • Lightly butter an 8″ square pan.
  • Heat cream to luke-warm in a large heavy sauce pan. Once warm, pour out half the cream into another container and set aside.
  • Add sugar, corn syrup and salt to the cream in the saucepan. Cook over medium heat, stirring constantly, until mixture boils.
  • Slowly add the cream that you set aside into the sauce pan, so the mixture doesn’t stop boiling.
  • Cook for 5 minutes, stirring constantly. Add butter and lower temperature but keep it boiling gently and continue to stir.
  • When temperature teaches 248F, remove from heat. Mix in vanilla (and optionally nuts) and let stand for 10 minutes.
  • Pour into pan and let cool to room temperature; remove from pan onto a cutting board and cut into pieces with a sharp knife. Wrap each piece in wax paper.

Notes

Depending on the temperature you cook this to, the same recipe can be used for soft gooey caramel or a harder brittle caramel. Makes 2lbs of caramel.

Recipe: Basic Chocolate Fudge

Basic Chocolate Fudge

A great recipe to play with.
Total Time1 hour

Ingredients

  • 4 oz unsweetened chocolate
  • 1 1/2 cups milk
  • 4 cups sugar
  • 1/8 tsp salt
  • 1/4 cup butter
  • 2 tsp vanilla

Instructions

  • Butter an 8″ square pan
  • Put chocolate and milk in a heavy saucepan; heat and stir over low heat until mixture is smooth and well-blended.
  • Add sugar and salt and stir over medium heat until sugar is dissolved and mixture starts to boil.
  • Continut boiling over medium heat, without stirring to the “soft ball” stage (234F on a candy thermometer).
  • Remove from heat and add butter and vanilla.
  • Let cool to lukewarm (110F) then beat the mixture until it loses its gloss and holds it’s shape. Pour into pan and cool until set, then cut into squares.
  • Enjoy!

Notes

Once you’ve mastered the technique of basic fudge, you can add all sorts of flavourings, nuts and more. Makes about 36 pieces.

Recipe: Uncooked Fondant

Uncooked Fondant

A very pretty and adaptable candy
Total Time10 minutes

Ingredients

  • 1/3 cup butter
  • 1/3 cup light corn syrup
  • 1 tsp vanilla or a couple drops of your favourite flavour extract and/or food colouring
  • 1/2 tsp salt
  • 1 lb 454g icing sugar

Instructions

  • Combine butter, corn syrup, salt  and any flavourings and colourings in a bowl and mix.
  • Add in icing sugar and mix, first with a spoon and then kneading by hand until it it’s well-blended and smooth.
  • Shape as desired and store in an air-tight container.
  • Enjoy!

Notes

This easy uncooked fondant can be used to make mints, pretty decorations, fillings for dipping chocolates and more. This recipe makes 1.5lbs of candy.

What’s Your 2020 Vision?

Coordinate a Retreat, Schedule a Meeting, Create a Product, Start a Business, Record a Podcast, Organize a Dinner, Plan a Party, Arrange a Farmer’s Market, Harvest a Crop, Build a Community Resource, Establish an Institute, Run a Workshop, Develop a Prototype, Film a Vlog, and so much more…

The Grist Mill and Gardens is more than just a lovely heritage site; it’s the perfect platform to build your own entrepreneurial opportunity. We’re now accepting pitches from the community for ways you’d like to use this site in 2020. Maybe you want to host a retreat or special event, maybe this is the perfect place to grow or add value to a product you’ve always wanted to create, or maybe you have a whole new business you’d like to develop.

Among our many assets are the 12 acre site itself and its heritage buildings, lovely gardens, wide-open spaces, 5 acres of uncultivated farmland and creekside campground. We have A/V equipment suitable for presentations, concerts and more. Our inspected commercial kitchen is available after-hours and off-season with a variety of gear you might need. We also have online infrastructure like an ecommerce store and ticketing system as well as thousands of fans on Facebook, Instagram, YouTube, Twitter, email and more. We even have tables, chairs, string lights, chalkboards and all the bits and pieces that help make events here a success.

We definitely have our own plans for 2020 as we host our usual series of community and private events, give tours and offer a range of workshops, presentations and concerts but we recognize that there’s room for so much more. Maybe you’ve got the perfect idea and the drive to make it happen…

Although we’re always willing to entertain good ideas, we’re in the middle of planning for the coming year and will be considering pitches submitted before December 7th, 2019 . We will keep whatever you submit confidential and you own your own ideas–if we can’t support your idea, you’re certainly welcome to take it elsewhere. (Please don’t hesitate to get in touch if you have any questions along the way; email us at info@oldgristmill.ca.)

So, what’s your 2020 vision, and how can we help make it happen?


Submissions will be reviewed in the order received; we’ll be in touch within two weeks to schedule a meeting, either in person or by phone.